
Replacing LVP Flooring After Water Damage
Laminate is an increasingly popular choice when it comes to flooring in people’s homes and businesses for many reasons. It’s affordable, beautiful, and easy to both clean and install – there are several pros to choosing laminate!
But as with most things, there are also some cons.
While laminate can handle some light moisture well, one major concern with this type of flooring is that it can be easily damaged by water if exposed to large amounts of it for too long. Even if a major spill is wiped up quickly, if the liquid seeps into the cracks unnoticed, it can cause major swelling in the boards, and with laminate, they typically must be replaced – there’s no way around it.
In our last post, we talked about some of the most common steps you can take to Prevent Water Damage in Your Home. However, despite careful precautions, the unexpected can still happen!
If you notice your laminate floor planks are puffy, swollen, cracked, buckling, splitting, or cupping, these are signs that your floor has taken on some major damage.
Thankfully, there are ways to repair water-damaged laminate flooring; you can even do it yourself!
Do you have carpet instead of laminate flooring? Check out our guide on How to Take Care of Water Damaged Carpets.
How To Replace Water Damaged LVP Flooring
BEFORE YOU BEGIN: Before beginning the following steps, be sure to determine the source of the problem. Was the water damage simply the result of a spill that never got cleaned properly, or is there a leak in one of your appliances? If it’s the latter, then the source of the leak needs to be repaired first to prevent any water damage in the future. Once this has been determined, carry on with the following steps.
1. Gather supplies.
You’ll of course want to have matching laminate floor planks to replace the damaged ones. Whether you installed the flooring yourself or had someone else do it, you most likely have some leftover planks to pull from. If you purchased the home and the previous owners didn’t leave behind any planks, you may have to do some research to find the exact style or one that’s similar enough so that it won’t make your floor look too eclectic – unless of course that’s what you’re going for. A simple internet search or calling a local flooring company can help you.
You’ll also need a tool to lift the floor boards (more on that in the next step) and replacement underlay. (Note: some laminate planks already come with underlay attached – check before you buy! Go to Step #4 to find out more.) If you’re not replacing an entire piece of flowing, you’ll want to have a circular saw on hand to cut down the new plank to size. Because laminate flooring is such a simple installment process, that’s hopefully the bulk of what you’ll need!
2. Lift the Old Flooring Planks.
Use a tool to lift the planks in the areas where they’ve already begun to warp from the damage. Depending on the type of laminate, its damage, and its installation, some tools may work better than others when prying up the boards. You can use something as simple as a putty knife to something as heavy duty as a crowbar. Find a tool that works for you and your situation that won’t harm the surrounding undamaged planks.
Remember that this can be a big project, especially if the damage is near the wall. If that’s the case, the baseboards will also most likely need to be removed to properly replace the flooring.
3. Clean and Prep the Area.
Once the damaged planks are completely remove, make sure the area is thoroughly cleaned and prepped for the new planks to be laid in. Check for and properly clean any mold or mildew that may have developed from the damage.
4. Prepare and Install the Underlay.
Next, you’ll want to measure and cut the right size and amount of underlay. Underlay is a thin foam-like material that goes onto the subfloor before the actual flooring is installed. It helps smooth out imperfections to make your floors even and comfortable. (Again, some laminate planks may already have the underlay attached; just be sure to check so you don’t buy anything you don’t need!) Once it’s been cut to size, lay down the underlay where the new planks will go.
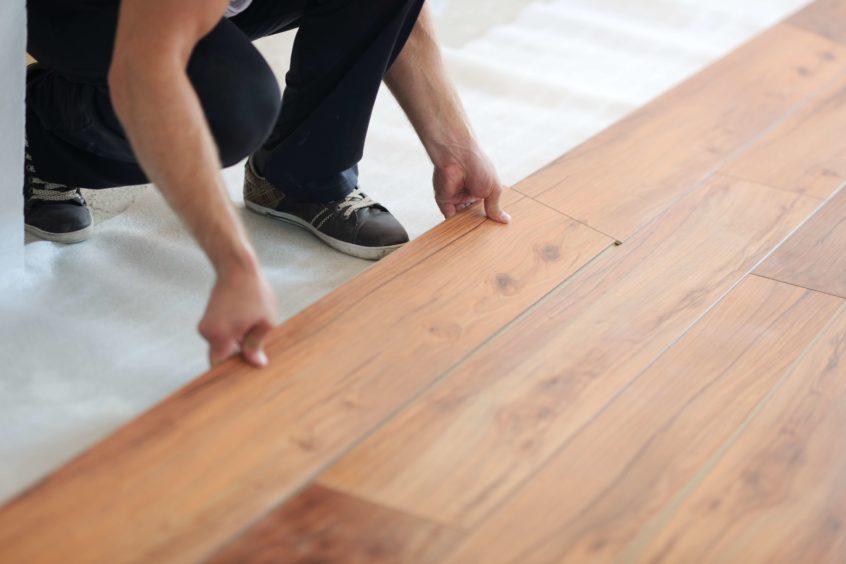
5. Install the New Flooring Planks.
Many laminate floor planks have an adhesive backing to make for an easy installation process. Remove this backing and place the flooring piece into its new position, pressing firmly to make sure it’s secure and properly in place.
Find Water Damage Restoration Services
And that’s it! If you had to remove the baseboards, now is the time to reinstall those. If at any time you have questions, feel free to contact your local Elite-Restoration office – we’re here to help!